Coconut Flour
|
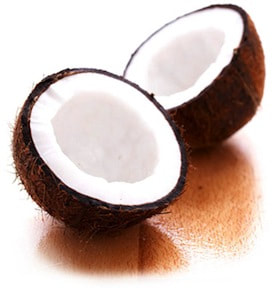
Coconut flour comes from the pulp of a coconut leftover after making coconut milk. It has a naturally sweet flavor and doesn't need much sweetener with it. Coconut flour is versatile in cooking and recipes don't take a lot of coconut flour. Also, due to its high fiber content it takes additional liquids; for every ounce of coconut flour used, it is important to use one egg. It is a great gluten-free flour alternative.
Uses: Breads, brownies, cookies, cupcakes, muffins, pancakes, waffles Key Nutrients: Fiber, manganese, copper, phosphorus, magnesium, iron, selenium, potassium Dietary Safe: Keto, Paleo, Gluten-Free, Low Carb, any diet |
|
Trusted Brands To Buy:
Click on the images below for purchasing options.
Click on the images below for purchasing options.
 |
 |
 |
 |
We do our best to make sure products are gluten-free, but companies change manufacturers and we can not guarantee their product. Please contact the company directly regarding their gluten-free guarantee.
Please note affiliate disclosure HERE.
Please note affiliate disclosure HERE.
How To Make Your Own:
- Take coconut flakes and soak for 4 hours in water at a ratio of 4:1 (Example: 4 cups water to 1 cup flakes).
- After soaking place in a food processor or high output blender until smooth.
- Over a bowl take all of the coconut mixture and place into a cheesecloth and squeeze as much of the liquid out as you can. Get all of the water out of it. This liquid is the coconut milk (it can be saved in the refrigerator to drink later or another use).
- Spread the pulp out from the cheesecloth onto a baking sheet (you can use a fork to break up any large clumps).
- Bake in a oven at lowest setting (150 degrees to 200 degrees) until dry, around four hours. Process in the food processor, high output blender, or coffee grinder until you have desired consistency, about 30 seconds.
- Either use it at that time or place in air tight container and put in refrigerator for a later date.
Date Sweetened Coconut Milk
Source: http://www.ahappyhealthnut.com/2015/02/07/date-sweetened-coconut-milk/
Ingredients:
Directions:
Note:
Source: http://www.ahappyhealthnut.com/2015/02/07/date-sweetened-coconut-milk/
Ingredients:
- 2 cups unsweetened shredded coconut or coconut flakes
- 4 cups hot (not boiling) water
- 5-6 medjool dates, pits removed
- a nut milk bag or cheesecloth
- a high output blender or food processor
Directions:
- Soak your pitted dates (if using them) in 1 to 2 cups hot water for 15 minutes
- Add your coconut flakes and hot water to the high speed blender. *Note- you can make any amount of coconut milk you want. This recipe yields 4 cups. Just use a ratio of 1:2 coconut flakes to water. Example: 1 cup coconut flakes to 2 cups water.
- Blend on high for 2-3 minutes.
- Place the nut milk bag or cheesecloth over a large bowl and pour the mixture from the blender through the nut milk bag.
- When the milk has cooled enough to handle, squeeze the milk through the bag or cheesecloth. Wring out thoroughly to get all of the milk out.
- Discard the pulp or turn it into coconut flour.
- If you’re making the unsweetened version, you’re done at this point. If you’re sweetening, pour the milk back into the blender and add the soaked dates. Blend on high for an additional 2 minutes. Once again, pour the mixture through the nut milk bag or cheesecloth and wring out.
- Store the coconut milk in an airtight container in the fridge for up to 5 days.
Note:
- As this mixture cools, the fat will separate and the cream will come to the top. You can scrape that off and whip it up into whipped cream, add it to smoothies, or add it to your coffee!
- This coconut milk will not be thick and viscous like the coconut milk you get in the can. Those usually contain thickeners and emulsifiers. This is just plain old delicious and completely nutritious coconut milk.
Feel free to print it off by clicking the PDF file below and add it to your recipes!
| Date Sweetened Coconut Milk |
Please note: Glutenwatchers has no affiliation or involvement in this video or with veganlovlie.